If you are contemplating your blog URL structure and are unsure if your URLs should include postdates, you have come to the right place. Here at webFEAT Complete we have had the opportunity to work on hundreds of websites and implement many SEO strategies to determine what the industry’s best practices are. Recently, we experimented with the effects of removing dates from URL structures. We will get to the results later, but first I would like to begin this post with some of the benefits and best practices of removing dates from blog URL structures as well as a how to for updating URL structures using WordPress.
The Benefits of Removing Postdates
-
Removing dates from your URL structure Improves User-Experience
- Typically, when you write a blog you are going to share the link on your social media accounts and website. Users will appreciate being able to quickly understand where a link is going to take them. If your URL includes a date, it is likely that the link will experience cut-off and your viewers won’t be able to read the entire URL. This can result in users choosing not to click on a link and ultimately hurting the performance of a post.
-
Removing dates keeps content relevant to Google and its users
- Imagine scrolling through the search results and stumbling upon two results with similar titles. Both will likely answer your query, but one result uses the post name (example.com/post-title/) structure while the other result includes a date from 2015 (example.com/8/16/15/post-title). Which result will you choose? Probably the link that seems more relevant and up-to-date. Removing dates from your URLs is a simple way to improve click-thru-rates and to give your website an advantage in the SERPs.
-
Removing dates allows for Evergreen content and the ability to change publish dates without having to create redirects
- A great SEO strategy is to update old blog posts by changing the publish date. Google loves fresh content and this is an easy trick to improve your website’s keyword rankings. If, however, you change the publish date of a blog that was using the /Date/Post Name/ URL structure, you will then have to create a redirect because your blog post will now have a new URL associated with it using the new publish date. Here is an example to help you better understand how this works:
Original URL: www.example.com/6/5/15/post-title/
New URL with updated publish date: www.example.com/8/1/19/post-title/
Recommended URL structure: www.example.com/post-title/
Now that you are aware of the benefits of removing dates from your URLs, let’s learn how to actually put it into practice using a WordPress website.
How to Change Your blog’s URL Structure in WordPress
- Crawl your site for all URLs using the /date/post-title/ structure. You can do this by using a number of tools, but we at webFEAT Complete enjoy using the Screaming Frog SEO Spider. Simply download the program, open the application, and then input your sites main domain address (example.com). Screaming Frog will take a few moments to finish its crawl, depending on the size of your site, but once the crawl is complete you will have documentation of all of your site’s current URLs. This will be ESSENTIAL to have after you have removed the dates from your URL structure and need to implement redirects.
- After crawling your site for all of its posts and pages, you are ready to remove the dates from your blog URLs. Depending on the Content Management System your website was built with, this step may be slightly different for each user. I will be showing you how to update your post URL structure and create redirects using WordPress.
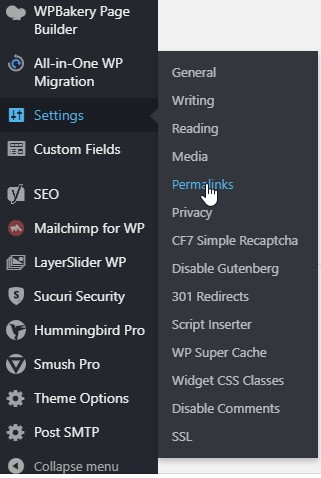
Login to the back-end of your WordPress site, then scroll down to Settings –> Permalinks

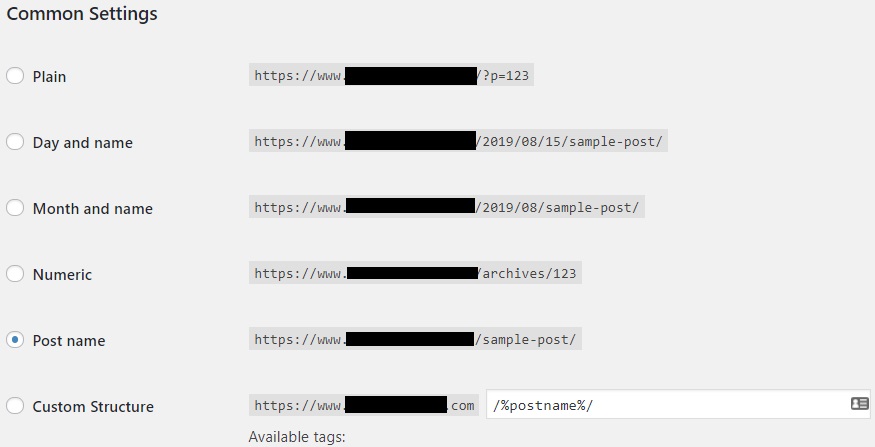
Click Permalinks and select the “Post name” option.

Click “Save” at the bottom of the page.
If you go to one of your blog posts you will notice the publish date is no longer included in the URL.
How to Create Redirects Using WordPress
It’s now time to setup your redirects so your posts maintain their SEO value and your posts direct users to the appropriate updated URLs. You must have a redirect plugin installed to complete this step. If you don’t, simply go to the plugin store and download any free redirection plugin available. I like to use 301 Redirects or Redirection. Creating redirects can be intimidating at first, but it’s really an easy task so stick with me!
- Copy and paste all of your old Blog URLs you crawled using Screaming Frog into an Excel spreadsheet.
- *Skip this step if you are using the 301 redirects plugin* Run a new Screaming Frog Report and copy and paste each new Blog URL into the column next to its corresponding old URL. Once you have two complete columns of your old and new URLs, you are ready to implement your redirects!
- Open up your redirect plugin (which is typically located under the Settings or Tools panel). When you are using 301 Redirects, you will only need the old URL. Type in the old URL Slug under the “Redirect From” column and then select “Post” from the “Redirect to” column as shown below.

You will then be able to select the Post Title that you are creating a redirect for. If you are using the Redirection plugin you can either upload your Excel file as a CSV with the suggested Redirection formatting or manually enter the “Redirect from” and “Redirect to” URLs. You will find the process to be very intuitive and simple once you have downloaded your preferred plugin.
Now the moment you have all been waiting for…
The Results of Removing Dates from Blog URLs

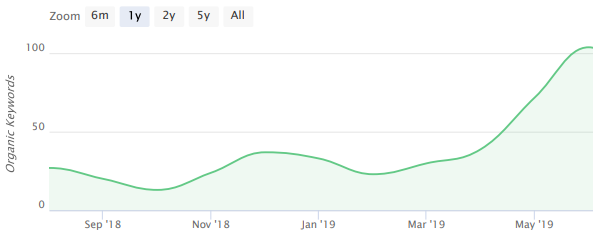
We removed the dates from the URLs of one of our successful HVAC clients at the end of April 2019 and keyword rankings more than doubled over the following two months as a result. We will be including more graphs and data after implementing this strategy for some of our other clients. Be sure to come back to this blog post over the next few months to see more graphs and results!
If you are still feeling overwhelmed, Get in Touch with us and we would be happy to assist you with your SEO needs.
“”

