It seems like almost daily the world becomes more and more reliant on the internet. For as many problems that we can solve through the internet, just as many can pop up as well. Especially now, during a pandemic, companies and brands are accelerating their efforts to move as much of their business online as possible. We’re even doing it over here at webFEAT Complete by moving our normally in person Lunch N’ Learn events to online, view from anywhere Zoom webFEAT Webinars.
You can expect this shift from offline to online to continue even after the COVID-19 crisis eventually ends as businesses around the globe realize the benefits of focusing on digital. However, as mentioned earlier this brings with it another problem. How does a person with a disability access your products or services that they could normally find offline now that they’re more online? ADA (Americans with Disabilities Act) Compliance has long been around but now more than ever lawyers and other compliance officials are taking action against companies who aren’t ADA compliant and suing (and winning) for huge amounts of money.
Maybe you’re aware of ADA Compliance on your website. But, did you know that there are ways that can also help people who rely on ADA through your social media channels as well? Yep, ADA Compliance for Social Media is becoming more and more important and should be viewed as not just another step you have to take but as a way to reach more potential people and as a best practice for your digital assets. Read on to see how you can better follow ADA guidelines through all of your social media channels.
General ADA Best Practices for Social Media
- Always include a description in your social posts – This one may sound obvious as it’s inherently a part of the social post process but it still needs to be said. Including a description thoroughly describing what your photo or video is about allows visually impared users to utilize a screen reader and have the post read aloud to them.
- Include Alt Text in your photos and videos – Similar to how you have the ability to add Alt Text to the media on your website, you can do the same on all social channels as well. Alt Text will allow a visually impared user to get a general idea of what the photo or video contains without actually visually seeing it. I will touch on how to do that for each specific channel, below.
- Add captions to your videos – This is important for deaf users. By adding captions to your videos you’re letting someone who can’t hear what the video is saying follow along via reading what’s being audibly spoken. Very important one. ALL of your videos should include closed captions. Again, I will show how to add these to your videos for each specific channel, below.
- Make sure ALL business information is correct and present – Again, this one seems like a no brainer but you’d be surprised how many companies don’t have this accurately filled out. This lets users who utilize screen readers to easily find out more information about you without the need to navigate away and try and find the information elsewhere.
- Clean up your shared URL’s – If your website has a bunch of URL’s with nonsensical numbers in the URL (which, it shouldn’t for general SEO best practices) or even if the URL’s are long in nature, consider using a URL shortener to condense and clean them up for easier accessibility. Tools like Bitly are free to use and allow you to create shorter URL’s with custom words.
- Label your outbound links – Following up on shorter URL’s, by labeling what your links are leading to it will help a user know what clicking that link will send them. For example adding [VIDEO], [PDF], [AUDIO] etc to your posts where appropriate.
- Don’t use too much text in your images – Try as much as possible to not get too crazy with text in your images. While this can be remedied with good Alt Text it’s just a good idea to have the bulk of your social post message be in the description to make it easier for screen readers. Some text is completely fine as long as your Alt Text and descriptions can also tell your message. Also, where possible use the largest text you can to help visually impared users better see it.
- Use correct Hashtag formatting – If you’re using hashtags in your posts make sure if they’re more than one word to correctly capitalize each word. By using proper capitalization a users accessibility tools will be able to more easily discern each individual word correctly. For example format #websitedesigncincinnati like this instead: #WebsiteDesignCincinnati. Easier for visually impared and non-visually impared users alike!
- Have good lighting – Sometimes a user may not be completely blind so it’s important that your photos and videos are properly lit so a user that has a hard time seeing won’t need to strain or struggle to see what the media is portraying.
ADA Compliance for Facebook
Add Alt Text to a Facebook Photo Post
The good thing about Facebook (and most social channels) is that when you are posting something like an image it will automatically attempt to assign proper Alt Text. However, it’s never a good idea to completely trust it if you’re concerned with ADA Compliance on Facebook. In order for Facebook to automatically assign Alt Text it has to use it’s Artificial Intelligence (AI) to attempt to discern what an image is showing — which isn’t always accurate.
To add/edit Alt Text to a Facebook photo post:
- In the compose post screen, after attaching your photo, hover over the picture and click on the “Edit” option button.

- On the next screen, click on the “Alternative Text” option .

- From there you will see two choices. The Alt Text auto generated by Facebook, and a Custom Alt Text field. This is where you can review Facebook’s version and decide whether or not it’s sufficient.

- As you can see below, I felt this Alt Text was not sufficient so I created my own custom text.

- Finally, hit “Save” and finish composing your post and you’re all done!
Add Captions and Proper Tags to a Facebook Video
Adding captions to a video posted on Facebook is extremely important. This allows a deaf or hard of hearing individual to have the same ability to watch the video as a non deaf user. Luckily again, Facebook attempts to make this easier with some auto tools however there are some key elements that we also need to correctly fill in to cover all bases.
To add captions, tags and titles to a Facebook video:
- After you choose the video you would like to share, you first want to make sure and add in the video’s details, which include: title, description, tags, and video language. These are important to detail as much possible not only for ADA but also for video discoverability. This is a two birds step in the process.

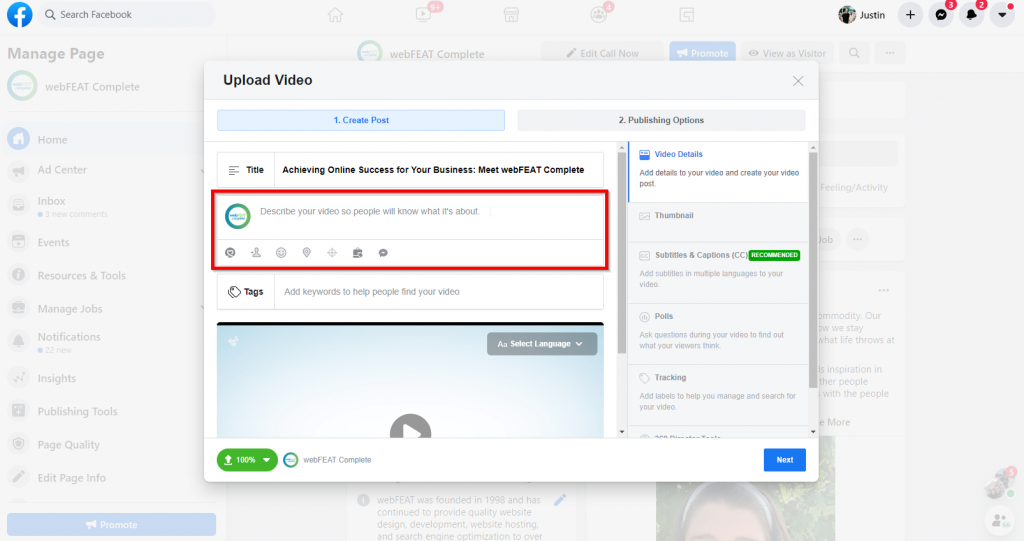


- Next, it’s a good idea to add in your own custom video thumbnail. This is what’s displayed if a user has auto-play videos turned off. Which, if a user has epilepsy, issues with stroke or other symptoms that come from too many moving elements they will have turned off. This allows them to get an idea of what the video involves without it auto playing. If you choose not to add in your own Facebook will automatically choose a random frame from the video which may not be the best representation of it.

- Finally, it’s time to add, edit or generate captions & subtitles. There are three ways to do this. You can either upload an .srt (SubRip) file you already have, manually write your own, or have Facebook auto generate them for you.

- Typically, I find that choosing auto-generate and then going in and editing them is the most efficient and precise option — which is what I do here. Once the subtitles are auto generated you can edit, in real time as the video is playing, any errors or fixes.


- Click “Save” and you’re done! You can continue on to post your video.
Add/Edit Company Information on Facebook
A generally obvious element to have filled out correctly on Facebook is the About Us and Page Info section. Like mentioned before having this filled in makes the process of acquiring info about you more frictionless and less restrictive to all users. You can find this area in the left hand admin pane of your main page settings. Make sure and have things such as address, hours, contact info, etc all accurate and matching with your other online listings and social media channels.


ADA Compliance for Instagram
Add Alt Text to an Instagram Photo Post
Adding Alt Text to an Instagram post is a little backward than how Facebook does it and isn’t really easily accessible or at all obvious.
To add/edit Alt Text for an Instagram photo post:
- You will need to first share the post. Again, make sure you have your description and appropriate hashtag formatting all filled in first. Then, click “Share” to share the post.

- After the post is shared find it in your profile feed and click on it. In the post look for the very small ellipsis in the top right of the post and push on it.
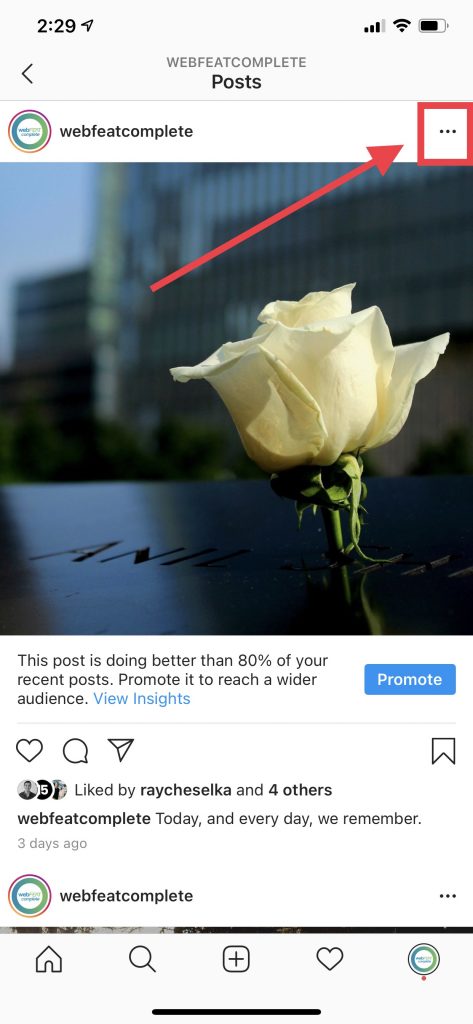
- From there, click on “Edit” in the list of options.

- You will notice two options overlaid on the photo. Click on “Edit Alt Text” in the lower right side of the photo.

- While Instagram does auto generate Alt Text like Facebook it won’t show it to you on this screen. You can view it in a browser through the source code but it’s not really accessible any other way. So, you’ll just want to create your own like below. Click “Done”.
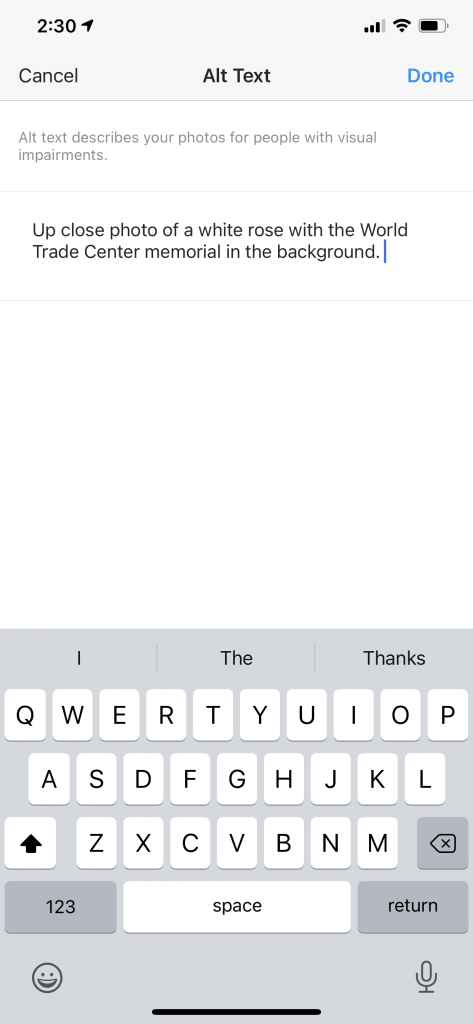
- While you’re in edit more if you haven’t already, it’s a good idea to add a location to the post for greater accessibility to all users.

- Click “Done” and Alt Text has been added to your post!
*Note – The ability to add Alt Text to Instagram Stories is not yet a possibility. I will update this post once/if that feature becomes available.
Add Captions and Subtitles to Your Instagram Videos
As buried as adding Alt Text to your IG photos was adding captions to your videos is even worse — or actually not even there. There is no official way within the Instagram app to add captions to your videos however there is a workaround using another app from Instagram called Threads. Essentially, Instagram Threads is a messaging app that allows you to send text, video and photo messages to your close friends. The feature we want to focus on within this app is called “Transcribe” which allows you to shoot a new video or upload a video you already have and have the audio transcribed into text over the video.
To add captions to your Instagram videos using Instagram Threads:
- Download the app to your phone from the Apple App Store or Google Play Store.
- Go through the setup process. You can skip the tutorial if you’re solely using this for the Transcribe feature and not as an actual messaging app.
- Select the Camera Icon or swipe down to enter the compose window.

- Click on the “Album” Icon, the little circle with mountains and a sun glyph.

- Once uploaded, select the “Transcribe” Icon. It looks like a little radio with a line diagonally through it.

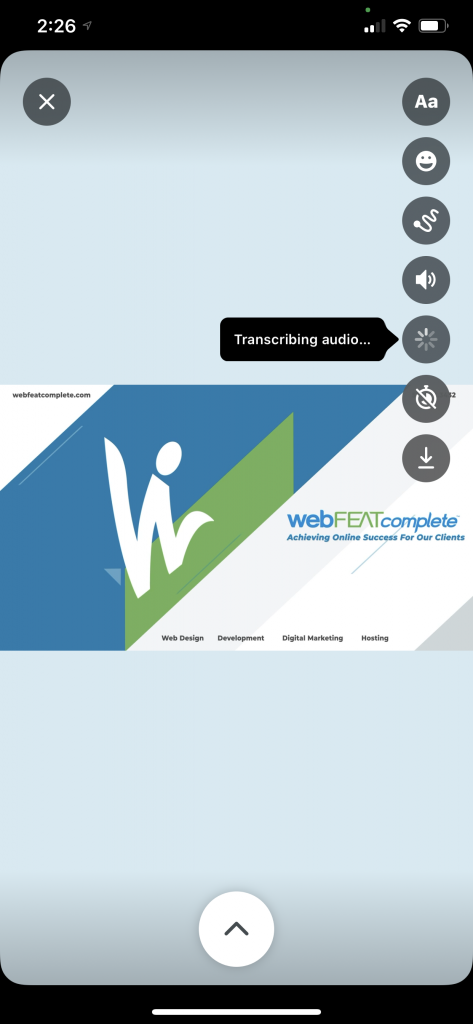
- Once completed you can play with the placement of the text. Once done, click on the “Download” Icon to download to your device.

- You can then upload that video to your Main Instagram Feed!
There are multitude of options that can do auto transcribing on your videos but most of them are not free. Using the method above has proven to be the most seamless and efficient way to do this. You can do a quick Google Search for similar tools if a desktop solution is more your thing.
ADA Compliance for Twitter
Add Alt Text (Photo Description) to Tweet Photo
Twitter also allows for the addition of Alt Text – or in this case Twitter classifies it as “descriptions” – to your photos.
To add/edit photo descriptions on Twitter:
- Click to compose a Tweet and upload the image you would like to share. In Tweet preview there are two ways to access the post description. Once way is to click “Add Description” option below the photo. The second way is to click the “Edit” button overlaid in the top right of the photo. Either option will take you to the same place.

- Once in the Alt Text area type in your photo description (up to 1,000 characters)

- Click “Save”. You will notice your post description located below the photo now.

- Continue crafting the rest of your tweet and then finish by hitting the “Tweet” button! You will also notice a new “ALT” tag in the corner of the photo in the feed and your profile letting users know there is Alt Text data attached to the photo.

Add Subtitles to Tweet Video
Unfortunately Twitter doesn’t make it easy to add subtitles to your videos on Twitter. The method to go about it, while an official way, is a bit convoluted.
How to add subtitles to a video on Twitter:
- Head over to the “Twitter Media Studio” using the option on the left hand options pane:

- You will enter the “Media Studio” which is a collection of every media item (photos and videos) that you’ve posted from your Twitter account. From here you can either select a video already posted or upload a new one.

- Once you’ve selected or added a video you want to add subtitles to you will see the following area where you are able to add video titles, descriptions, categories and even a Call to Action (CTA). Make sure these are filled out and correctly labeled. YOu will also notice an option where you can change the default cover image for the video.


- Next, click on the “Subtitles” option. This is where things get sketchy. In order to add subtitles to your video you will have to have a .srt file prepared with the script. Twitter is unable, at this point, to auto generate any sort of subtitles. However, once we get to it, we can use YouTube to create subtitles automatically and download that .srt file to use for Twitter. So it’s not completely seamless but it does get the job done. Skip ahead to the YouTube section to see how to generate an .srt transcription for use with Twitter.

- Click “Upload” and your subtitles will be added to that video! You can then tweet that video or if it’s already tweeted the captions will be retroactively added to the video.
Accessibility Options on Twitter
Take note of some of the accessibility options within Twitter. If you have followers you know would find these useful point them in the right direction for a more enjoyable Twitter experience.
To find accessibility options in Twitter:
- Click on “Settings & Privacy” in the left hand options pane.

- Locate the “Accessibility” area and select it.

- Review available Accessibility settings. There are options for both Vision and Motion.

ADA Compliance for LinkedIn
Add Alt Text to LinkedIn Photo
LinkedIn might have the most obvious and straightforward method of adding Alt Text to your photos on the social network.
To add Alt Text to a photo on LinkedIn:
- Enter compose mode by clicking either the “Photo” option or “Start Post” option.

- Upload the photo you want to post. Once uploaded you will notice an “Add Alt Text” option overlaid on the photo. Click on it to edit.

- Add in your Alt Text up to 120 characters. Click “Save” then click “Done” and finish composing your post.

- That’s it! You’ve added Alt Text to your LinkedIn post!
Add Captions and Titles to your LinkedIn Video
The method to add captions to your videos on LinkedIn is pretty straightforward much like the Alt Text options. However, similar to Twitter, LinkedIn does not have an Auto Generate Captions tool so you will have to come prepared with an .srt file already saved to select. Again, if you need to know how to use YouTube to generate that .srt file please skip ahead to see how to do that and then come back and continue with your LinkedIn captions.
How to add captions to your LinkedIn video:
- Choose the video you want to post to LinkedIn. Once uploaded select the “Edit” button located on the video preview.

- You will be taken to the Video Edit area where you can add a video title, upload your captions and change the video thumbnail preview. Make sure all of these are correctly filled in.

- Click “Done” and the captions will be attached to the video. Then finish composing your post!
ADA Compliance for YouTube
Add Subtitles and Caption to Your YouTube Videos
Did you know that YouTube is the second largest search engine on the internet?! Yep, that’s right – only next to their owners, Google. As such it’s important that your videos are following some general ADA standards. The most important thing is making sure your closed captions are in good shape. There are a couple ways to add subtitles to YouTube videos but I’m going to assume that you don’t already have an .srt file handy to upload, so this is how to auto generate subtitles.
How to add subtitles & closed captions to your videos.
- Upload your Video as you normally would making sure to add relevant titles, descriptions, categories tags and other options. Click upload. Then head over to “YouTube Studio” using by clicking your avatar in the upper right hand corner and navigating to “YouTube Studio”.

- Next, navigate to the “Videos” tab on the left hand side of your screen.
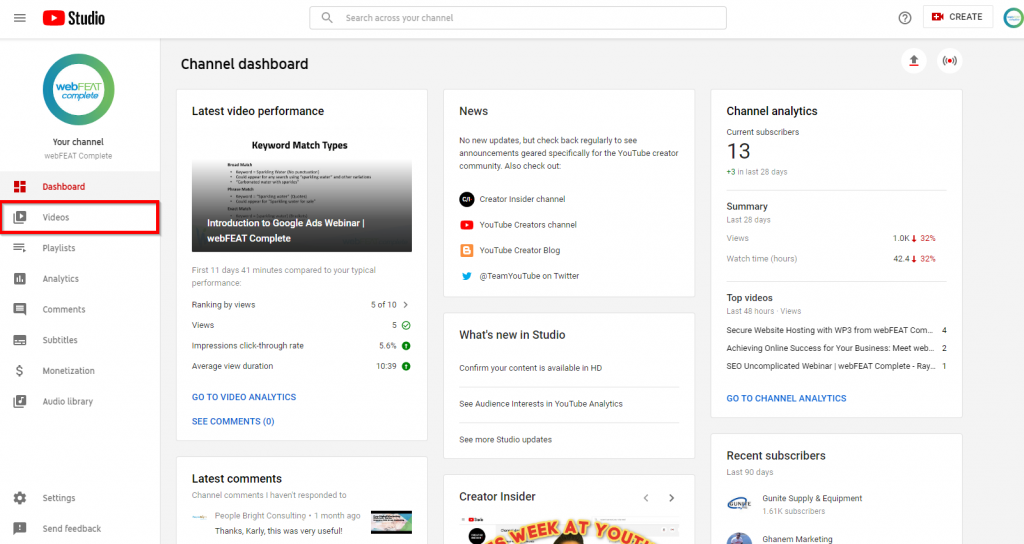
- From there find your newly uploaded video and click the edit pencil icon to enter edit mode.

- Then navigate to the Subtitles tab on the left side of your screen.

- Next, click on the ellipses under the Subtitles Title and click “Edit” if already auto generated or “Add” if not.

- You have three options to choose from. In our case we are going to select “Create new subtitles or CC” because we don’t yet have any transcribed captions so we need to create them.

- On this screen you will have the opportunity to add/edit subtitles to your video. Much like Facebook you will be able to adjust the subtitles in real time as the video plays. Once complete click “Save Changes” then “Return to YouTube Studio” to submit.

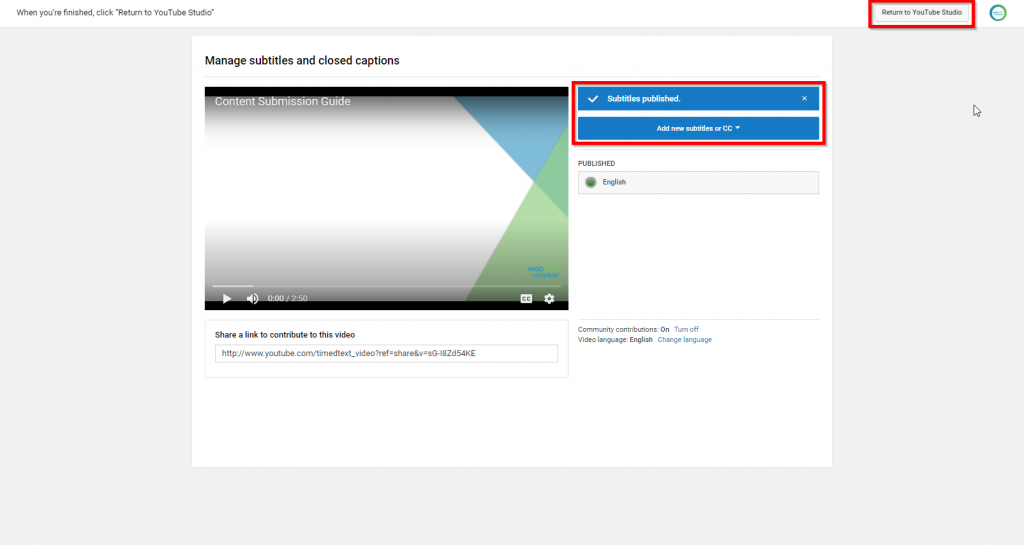
Download YouTube Video .SRT File for Use on Other Social Networks
Now that you added subtitles to your YouTube video you are able to download an .srt file so you can then use it on other channels that don’t have auto generate tools, like LinkedIn and Twitter.
To download a YouTube Video .srt subtitles file:
- In the same Subtitles area that you added the subtitles to click on the ellipses under “Subtitles” title.

- Navigate to “Download”. Then select “.srt” to download the file.


- That’s it! You now have an .srt file to upload on other social channels or your website!
Summary
So, as you can see there are a lot of things that you can do to make sure you are following some general ADA guidelines. While it may not be feasible to go back in time and update all of your social media posts with Alt Text, subtitles and other ADA best practices is a good idea to keep up on those moving forward as it’s becoming a more and more important thing to follow.
Not to mention, by following ADA Compliance guidelines across all of your digital assets you are also helping to improve your general SEO. By making your content easily accessible to users you are also inherently making your content more easily accessible to Google. So Google and other search engines will be able to understand what your content is about. They are more likely to rank you higher than content that they don’t understand as well.
More Resources
If you want some more resources we’ve listed each major social channels Accessibility resources if you want to read more into the types of things you can do to make sure you are following ADA guidelines for your social channels.
Official Facebook Accessibility Page
Facebook Help Center: Accessibility
How do I use a screen reader for Instagram?
How do I adjust the text size of Instagram?
Creating a More Accessible Instagram
LinkedIn Policy: Accessibility for All
Twitter Help Center: How to make images accessible for people
Twitter’s official Accessibility Twitter account
YouTube
Google Product Features (All the way at the bottom under “YouTube”)
“”

