Over the past two years, you may have noticed a significant increase in the number of videos that appear on your social media feeds, especially Instagram. Previously known for its photo-sharing features, Instagram has recently shifted their focus to vertical, short-form videos, as this type of content seems to draw the most engagement from consumers. All around the world, people use Instagram Reels to create, discover, and share entertaining short videos.
We know that you’ve probably seen an Instagram Reel before – but do you know how to create one? Creating a quality Instagram Reel isn’t as easy as it looks, as it requires a lot of brainstorming, skill, experience, and so on. In this article, we will guide you through the step-by-step process of how to create a Reel, and if you are a business owner, how to use Reels to grow your business. By the end of this article, our goal is to have you confident in your ability to create high-quality Reels, just like the pros!
What Is A Reel?
Simply put, Instagram Reels are short, full-screen vertical videos that consist of light-hearted, engaging, or funny content for its viewers to like, share, or recreate. Reels also add to a consumer’s user experience, as they are playable on infinite scrolling. When you think about it, it’s no wonder why so many people get sucked into watching Instagram Reels.
As a creator, you have the option to make your video anywhere from 15 to 90 seconds long. Included in the Instagram app are several unique editing tools, such as the option to add soundtracks, filters, subtitles, stickers, interactive backgrounds, and many more. It is up to you, the creator, to use these features to the best of your ability when creating your Reel.
As a business or casual user, you can use Reels to showcase products, make announcements, feature employees, get creative, or have fun. In the end, Reels are a great way to showcase high-quality content to your viewers, as well as extend your reach and engagement. In addition, Instagram Reels also recommend relevant videos to people based on their interests, attracting more people and resulting in a larger audience.
How To Make Instagram Reels Like A Pro – Video Content
Looking to create a Reel for your personal page or business? Follow these 4 steps below, and you’ll be making reels like a pro in no time!
Step 1: Begin Your Instagram Reel
As you look to get started on your Instagram Reel project, it is important to note that there are three ways that you can begin the process.
- In the Instagram app, locate the Reels tab by clicking the
 or plus button in the upper right corner of the screen. From there, swipe on the slider at the bottom of the screen to select “Reel”.
 - On your profile page, click the
 or plus button in the upper right corner of the screen. From there, you will be prompted with a list of content types that you can create. Select the first option, “Reel”.
 - On the Reels player tab (located in the bottom center of the navigation), click the camera button in the upper right corner to begin creating your Reel.
![]()
Step 2: Record or Upload Videos
Whether your video clips are ready to go or still need to be filmed, Instagram allows you to directly record your clips through the Reel camera as well as upload them from your phone’s camera roll.
Recording:
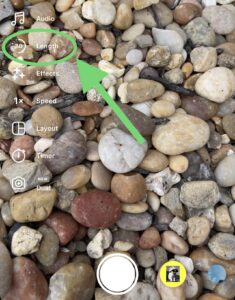
When recording a video through Instagram’s Reel camera, you’ll want to set the duration before recording. You can do this by clicking the “Length” button on the left side of the screen. Video length options consist of 15, 30, 60, and 90 seconds.

Once you have selected your desired video duration, there will be a countdown before the video recording begins. To begin recording your video, press and hold the circle located in the bottom middle of your screen.
Uploading:
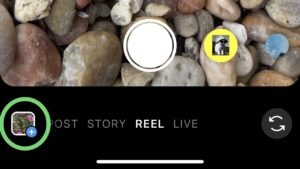
If you already have your video clips recorded, click on the square icon in the bottom left corner of the Instagram Reel editor to begin uploading. Once your clip(s) have been uploaded, the next step is to begin editing.

Step 3: Editing Your Reel
Once your clips have been uploaded, you can begin editing them. Below, we’ve put together a list of the editing features that we find to be most useful for Reels.
- Add Audio. To add audio to your Reel, click the music icon on the left side of your screen. From there, you can find music through the search box or by exploring Instagram’s pre-set list. Once you’ve selected which audio you’d like to use, you can also select which part of the song you’d like to play.
Note: Audio that has an arrow facing towards the upper right next to it is marked as “Trending”. Trending audio typically brings the most engagement and views to your posts.

- Add AR Effect. Click on the star icon to access the list of AR effects. Here, you can find a wide variety of video effects created by Instagram and other creators.
- Speed & Layout. Select the playback speed of your video. Want your video to be in slow motion, or sped up? Speed options consist of 1/3, ½, 1x, 2x, 3x, and 4x. Adjusting the layout allows you to fit multiple recordings into one frame. With this feature, you can have up to 6 different videos in the same frame.
- Add Text & Stickers. Add some character to your post by using text and stickers. Looking to get a certain message across? Here’s where you can do that.
- Dual *New*. Instagram’s latest addition to the Reels editor is Dual Mode. By pressing Dual, you will be able to record video from your front and back camera at the same time. This is the perfect feature for filming reactions, reviews, and more.

Step 4: Posting Your Reel
Once your video content has been created and finalized, the next step is to write a caption and post your reel. During this process, you will have the option to add a location to your post and choose whether or not you want your Reel uploaded to your profile’s feed. When your post is ready to go public, tap the “Share” button at the bottom right of the screen. This will publish your Reel immediately.
How To Make Instagram Reels Like A Pro – Photo Content
Now that you know how to make an Instagram Reel with videos, we will show you how to create one with only pictures. Listed below is a detailed list of how to create an Instagram Reel using pictures:
- Open the Instagram app on your phone, then tap the or plus button in the upper right-hand corner. From there, select the Reel tab.
- After the Reel editor opens up, click the icon at the bottom left corner of the screen to access your camera roll.

- From there, select as many images as you’d like to use in your Reel. Once selected, you can adjust the playback speed of each picture by dragging the slider located under each photo. Playback speeds vary between 1-5 seconds.
- Once adjusted, click the “Add” button at the top right. From there, you can select the audio that you’d like to use on your Reel.
- Once you’ve selected your audio, press “Next”. This will give you a preview of your Reel. During this step, you will be able to add text, effects, stickers, and get to see your final product.
How To Leverage Reels For Business
Looking to use Reels to grow your business? As mentioned earlier, Instagram users have been rapidly increasing their time spent viewing video content. After learning about how Reels can expand your page’s audience and engagement, there opens up an entirely new outlet of opportunity for your business to grow.
Below, we’ve put together a helpful list of tips to consider when making Reels for your business:
- Use an attractive, engaging opening. The average consumer will watch the first 3-10 seconds of your video, as attention spans are typically 8 seconds long.
- Add branding elements to your video. Use your company logo or name as a watermark or introduction to your video. This will make the audience more familiar with your brand.
- Use viral audio. Aside from resonating with its consumers, adding viral audio to your Reels feeds into Instagram’s algorithm. In other words, you might notice that posts with viral, trending audio perform significantly better than the ones who don’t.
- Insert a call to action. Drive more engagement through the use of CTAs in your Reels. CTAs allow you to prompt consumers to click a link in your profile, follow your account, send a DM, and many more.
Conclusion
If you’ve made it this far into the blog, we hope that you have created a high-quality Reel along the way! Reels will continue to be the forefront of Instagram and social media as we know it, as companies like Facebook, TikTok, and many others have been striving to prioritize short-form, vertical videos on their platforms.
Want To Leave Your Video Content Up To The Pros? We’d Be Glad To Help!
At webFEAT Complete, our team is experienced and up to date with the latest and greatest digital marketing trends. From social media management to social ads, and everything in between (like Reels), we’ll help your business gain a leading edge against its competitors. Contact us today to schedule an appointment!
“”

